Printing Services
Frequently Asked Questions
 HOW TO CHOOSE THE RIGHT KIND OF PAPER
Choosing the right kind of paper for your projects depends on several things: printing technique used, desired use, costs, finishes, texture, etc. Moreover, each type of paper comes in different “weights”, which determines the thickness and rigidity of the paper/cardboard (see article on Paper Weight).
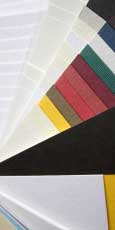
First you need to differentiate between coated paper and uncoated paper.
Coated paper (or printing paper) is a kind of paper that is coated in mineral pigments in order to get a matte, shiny, or glossy finish. Thanks to these “coats”, the paper will absorb less ink, and the colors will be more vibrant. (for example: posters, cards, pamphlets). Uncoated paper is more rough, which allows for handwriting on it without any bleeding or dripping. Without the “coats”, the paper absorbs more ink and the colors are not as vibrant. It’s an ideal paper for
letters, notepads, bills, etc.
Some cardboard papers have one coated side and one uncoated side. They can be very useful for example for business cards which are printed one side and blank on the other, which allows for writing notes on it.
Here is a list of other paper types we use and their standard size:
- Bond and Writing(17” x 22”): uncoated writing paper, includes ledger, readily accepts ink and can be erased.
- Text (25” x 38”): book paper, uncoated, (often of an interesting color) used for announcements.
- Offset (25” x 38”): book paper, uncoated, treated to withstand moisture.
- Opaque (25” x 38”): book paper, uncoated, treated to be less transparent.
- Card (20” x 26”): cardboard paper, used for book covers, brochures, etc.
- Bristol (22.5” x 28.5” and 22.5” x 35”): card paper, can be folded, embossed, stamped.
- Index Bristol (25.5” x 30.5”): board paper, harder surface than Bristol.
- Newsprint (24” x 36”): very acidic newspaper, degrades quickly.
- Digital: paper which adapts to digital printing techniques.
- Kraft: Very durably, often used for packages or envelopes. Can also give an “industrial” effect to some files.
- Copy paper (carbonless): the type of paper most often used for shipping or shopping tickets, bills, etc.
 DIGITAL PRINTING
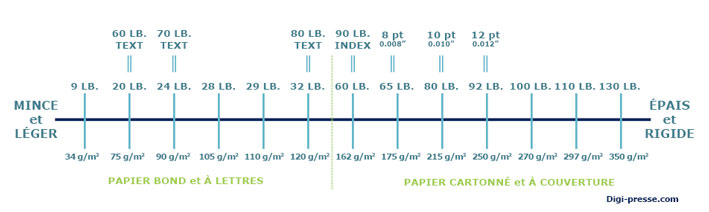
Paper weight, in pounds, is the weight of 500 sheets. The trick is the basis size differ from one category of paper to another! As for the paper weight in grams, it refers to the weight by square meter (gr/m2).
For a same weight, the opacity and rigidity vary depending on density and quality of paper. Please note that we usually use point measurements (pt) for board papers.
Here’s a generic list of paper usage depending on their weight:
- 75g – 20lb (stickers, labels, paper letter).
- 90g – 24 lb (ideal for letterhead paper, pamphlets).
- 105g – 28lb (banners, posters, pamphlets, booklet or calendar pages).
- 110g – 29lb (pamphlets, leaflets, banners, posters).
- 120g – 32lb (ideal for pamphlets, banners, leaflet, booklets, brochures).
- 162g – 60lb (pamphlets, leaflets, commercial banners, brochures, booklets).
- 175g – 8pt (large banners, posters).
- 215 – 10pt (ideal to print business cards, postal cards, table identifiers)
- 250g – 12pt (ideal for birth announcements, greeting cards, menus, business cards, commercial banners).
- 270g – 100lb – 14pt (business cards, postal cards, menus, folders, booklet covers, announcements, calendars).
- 350g – 130 lb – 18pt (business cards, postal cards, folders, covers).
 VARIOUS FINISHING TECHNIQUES ARE USED TO CHANGE THE PAPER’S CHARACTERISTICS
Such as:
- Uncoated or offset is a type of paper that hasn’t been coated in surface pigments.
- Matte coated, no calendering, is a type of paper with a slightly rough and non-shiny surface.
- Matte coated, with calendering, is a type of paper with a smooth and matte surface.
- Gloss coated is a paper with calendering, with a glossy coat that reflects light.
 BLEED
BLEED
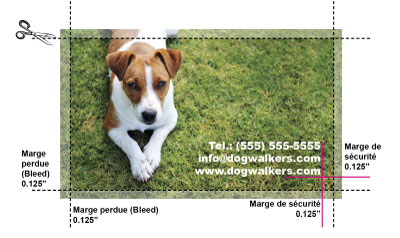
Bleed is a term that refers to the image being larger than the final size of the paper (it “bleeds” on the edges). Without this bleed, it is very likely that your picture ends up having small white margins on the sides. This is a normal phenomenon because when your document gets trimmed, the sheets might move. Thus, it’s important that your image or background color goes over the desired size so that you have leeway with the printer. A minimum of 1/8 inch (about 3,2mm) of bleed should be added on the edges on each side of the “trim line” where your document will be trimmed. For example, a document in which the image meets the edges, and which should be 4” x 5” in the final product, should actually be 4.25” x 5.25”, including bleed.
SECURITY MARGIN
Another important point: the security margin. For the same reason you need a bleed margin, I.e the risk of the sheets moving when they are trimmed, you need to put your text or other important elements such as logos a little further way from the trim line so as to make sure these don’t get cut off. It’s very important to have an inside margin of at least
1/8 inch all around your document.
IMPORTANT:
For a good printing quality, the resolution of the images in your documents should ideally be of 300 dpi (see more information about this). Your documents also need to have the right colorimetry for printing, i.e. in CMYK.
We recommend you send your files in:
- Adobe Acrobat Document – Press quality (*.pdf)
- Adobe Illustrator Artwork (*.ai, .eps or .pdf) – outline text and link all images
- Adobe Photoshop Image (*.psd) – flatten artwork (recommended)
- Other accepted file types:
- Bitmap Image (*.bmp)
- GIF Image (*.gif)
- JPEG Image (*.jpg,*.jpeg)
- PNG Image (*.png)
- TIF Image (*.tif,*.tiff)
- Microsoft PowerPoint Document (*.ppt and .pptx) – Converted to press quality pdf
- Microsoft Publisher Document (*.pub) – Converted to press quality pdf
- Microsoft Word Document (*.doc and .docx) – Converted to press quality pdf
- PostScript Document (*.ps)
Let’s start by differentiating the two main models:
 The RBG color model:
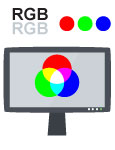
It’s made up of the 3 colors of life: red, green, blue (hence the RGB name).
It’s used by computer screens, TVs, phones, digital cameras, household printers, etc. The more light there is, the more vibrant the color will be. If you put all these colors together, you get white.
That’s why this model is used for everything that will end up on a screen.
A picture taken from a website will be in RGB. Same goes for pictures taken by your phone or your digital camera.
 When printing, we use the CMYK four color model:
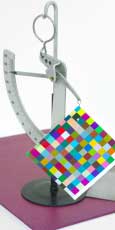
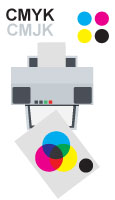
Printers use 4 colors of ink: cyan, magenta, yellow, and black.
They represent the 3 primary chemical colors (the ones we learn about in school), which, when mixed together, give the other colors available in printing.
However, because the 3 mixed all together will never give a black that is intense enough, black is added as a 4th color. When printing, the ideal black is: CMYK 30-30-30-100: or 30% cyan, 30% magenta, 30% yellow, 100% black.
Please note:
- The choice of paper is also very important when printing: a coated paper will give more vibrant colors compared to uncoated paper (learn more about paper types).
- It’s more cost effective to print in black and white, since only black will be used.
It’s important to keep in mind that the color you get with CMYK is not as nuanced and bright as the one you’d have in RGB. To make sure you get exactly what you want, remember to create and save your documents in CMYK before sending them to us. If you don’t, the colors may be inaccurate or more dull.
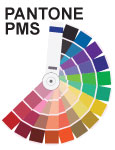 Pantone® colors (see: www.Pantone.com). Pantone® colors or PMS (Pantone® Matching System) is a well known color chart around the world. It is made of pre-mixed colors, and is mostly used in cases where the color needs to be very accurate and reliable on all products, no matter the offset* printing location. One example: the Coca-Cola® red is the same everywhere in the world.
There are different Pantone® palettes depending on the type of paper: coated, uncoated, and matte. Moreover, this palette offers ink choices that would be impossible to have with the CMYK model, such as, for example, metallic gold, silver, or neon.
At Digi-Presse, we print with CMYK, with digital printers, and non-offset*. However, we are able to offer a final product that will be very close to the desired Pantone® color. Additionally, we have specialized suppliers for metallic colors. Please contact us for more information on Pantone® colors.
*Offset printing: printing process which uses lithographic plates for each color. Each one of them is applied to the paper one by one, while digital printers apply the colors at the same time. We mostly use offset printing for very large products, such as newspapers, mass production of books, packages, paper money, etc.
 WHY IS HAVING AN IMAGE RESOLUTION OF 300 DPI SO IMPORTANT FOR PRINTING?
Resolution, size, weight, dimensions… this might get confusing…
You might have taken a bunch of high resolution pictures on your digital camera once, and see it take so much space on your drive. Inversely, you can take a lot more pictures if the resolution is low. If you want to post a picture on your Facebook page, it’s not an issue, the low resolution picture will work.
But why is that not the case when it comes to printing?
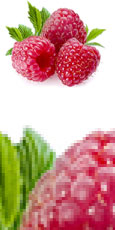
An image for the Internet has to be light (weight) so that it can be uploaded quickly, and it doesn’t need a high resolution because a screen only displays in 72 dpi. That’s why images taken from the Internet are often disappointing when printed.
When printing, you will ideally want a 300 dpi resolution for your image in its final size. The bigger you want your image to be, the heavier it will be to send this file to printing services. If you send a 200 kb image to print a 12” x 18” poster… it won’t work…
Here’s why:
- The basic vocabulary to understand first:
- A bitmap image (.jpg, png, tif, gif, bmp…) is made of pixels. A vector image is completely
different (see below for more information)… - Resolution is calculated with pixels per inch (dpi or ppi, dots or pixels per inch). What it means is that the more pixels there are per inch, the more your image will be clear and defined, but also heavier.
- The image size (file size) is the space an image will take up on your camera or on your computer, and it’s calculated in octets (1kb = 1000 bytes, MB = 1,000,000 bytes, etc.)
- A bitmap image (.jpg, png, tif, gif, bmp…) is made of pixels. A vector image is completely
- The size and dimension of an images are TWO DIFFERENT THINGS:
- The dimension is for displays/screens, and is numbered in pixels: for example, 1500px x 900px.
- The size of an image is for the printed product, and is usually stated in inches or centimeters.
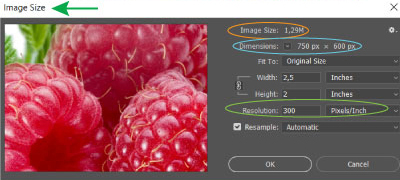
So in that case for example, we have an image with colors, in .jpg format, with a 750px x 600px dimension, its size may vary depending on its resolution:
at 72 dpi, it will be 10.40” x 8.33”
at 100dpi: 7.5” x 6”
at 300 dpi: 2.5” x 2”
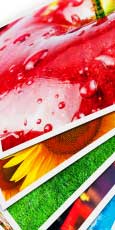
 Same goes the other way around, if we change the image’s resolution while keeping the same size, in this example we’re keeping the raspberries at 2.5” x 2”, the dimension and the file size will change:
at 72 dpi,its dimension will be 180px x 144px and the file size will be 75.9 kb
at 100dpi : 250 x 200 px – 146.5 kb
at 300 dpi : 750 x 600 px – 1,290 kb (1.29 MB)
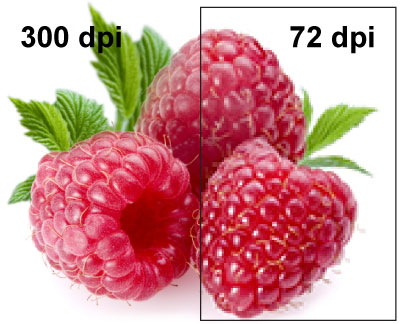
When comparing both images side by side, you can clearly see that the 72 dpi is much blurrier, because there are less pixels per inch.
A vector image is created to allow for it to be resized and enlarged as much as you want, while still keeping the same image quality.
They are more difficult to create, and are often done by a graphic designer, usually through a software like Illustrator or Corel Draw. Vector images are often saved with file types like .ai, .eps or .pdf.
As opposed to a bitmap (jpg, bitmap, png, etc.) which is composed of dots (named pixels), and which loses quality if enlarged, a vector image is made of a network of dots, linked by line segments (also called Bézier curves). Each element has a specific place and everything is linked through a mathematical system which will keep each element’s proportions intact no matter what the final size is. Thanks to this system, a 1cm x 1cm logo can be enlarged to be 2m x 2m without losing any definition quality.
 But beware, you can’t just save a bitmap logo (png, jpg, gif, etc) to a vector file in order for it to be vectorized. Vectorizing an image requires a lot of time, and can sometimes be difficult or impossible to do. So it’s important, for logos for example, to keep the vector versions of everything. Please do ask your graphic designer.
Please note: many of you don’t have the appropriate software to open an .eps or .ai file, so ask your graphic designer to also give you an editable .pdf version. One tip to help you know whether or not an image is a vector in a pdf file: zoom in on the image in Acrobat, let’s say to 300%. If the edges remain nice and clear, it is most probably a vector.
Pages Must Be in Multiples of Four
Folding any sheet of paper in half will create four separate panels. Because saddle-stitched booklets are constructed entirely of folded sheets, the page count must therefore be a multiple of four.
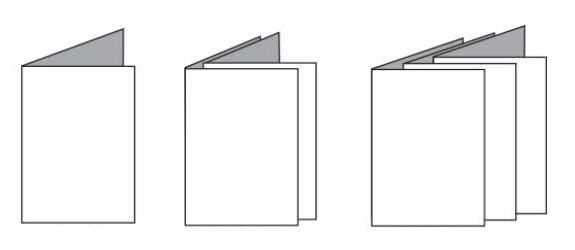
Since each folded sheet joined within the finished booklet will form four pages of the booklet, it is not possible to create a 7-page, 10-page, or 25-page saddle-stitched booklet. The only feasible page counts for saddle-stitched booklets are 4 pages, 8 pages, 12 pages, 16 pages, 20 pages, 24 pages, 28 pages, 32 pages and so on. Even if a page within the booklet is blank, it still counts as a page.